
For all you first time star quilt makers, my very first small quilt was boring squares hand sewn, for a few blocks, I guess I thought I was going to do the hand make it all thing, it moved to the sewing machine quickly, was horribly ugly, but did get tied with the help of my Grandmother. My next quilt was a star, I made my own templates, the wrong angle if course, I had a very nice 7 point star and enough diamonds to do a million of them, well only 3 ever got finished. Now we have nice rulers and rotary cutter with matts. If it was possible to do it wrong, trust me it went wrong, I had nothing but a 1934 flyer my grandmother had gotten in the mail as a guide. You get this nice little tutorial with pictures.
My star quilt tutorial is for everyone, at any stage of star quilt making, beginner on up. The diamonds are cut individually so you have more flexibility in design.
You will need to bring with you a 45° ruler, a rotary cutter, matt and an "I'm going to have a great time making this, attitude" As my adopted Assiniboine grandmother Almira use to say, "if you wake up expecting good things to happen, they do!"
I am only cutting one color of new diamonds because tons of them are cut from my recent star quilt marathon.
I want to keep this as simple and as informative as possible. I like my row, (usually Row 7) with the most diamonds to be the same color, usually dark, as the very center and very outer diamond, to match.
I think this lends some kind of continuity to the over all quilt, enhancing the radiant effect of the star. This is your quilt though, so if you like something else better please use it. You need 8 X 2 =
16 diamonds for the inside and out side points, 8 X 7 = 56 diamonds for the big circle. A total of 72 diamonds = 8 rows of 2 1/2" strips, this gives you 8 extra diamonds, you may or may not use them in this quilt, this is less then 24" of fabric, less then 2/3 rds of a yard. Depending on how many colors you decide to use, you do not need big pieces until the background squares and borders! Sometimes you will only need one 2 1/2" strip.
What colors do you want to use? You will need 3 or 4 or 5 or 6 depending on the look you want, the background, how much fabric you want to buy or how much you want to use from your stash.
Here is a link to my web site star quilt page, for color ideas, you can also google star quilts. You will also find other star quilts through out the blog.
A 2 1/2" row of diamond makes 10. I am going to lay out a 7 diamonds across star - this is 49 diamonds per point X 8 = 492
You may choose to only use 6 diamonds across which will be 36 diamonds per point for a total of 288.
 |
| The color I am adding, I am choosing this color because there is enough to finish the quilt and I don't want any more UFO's hanging around. |
 |
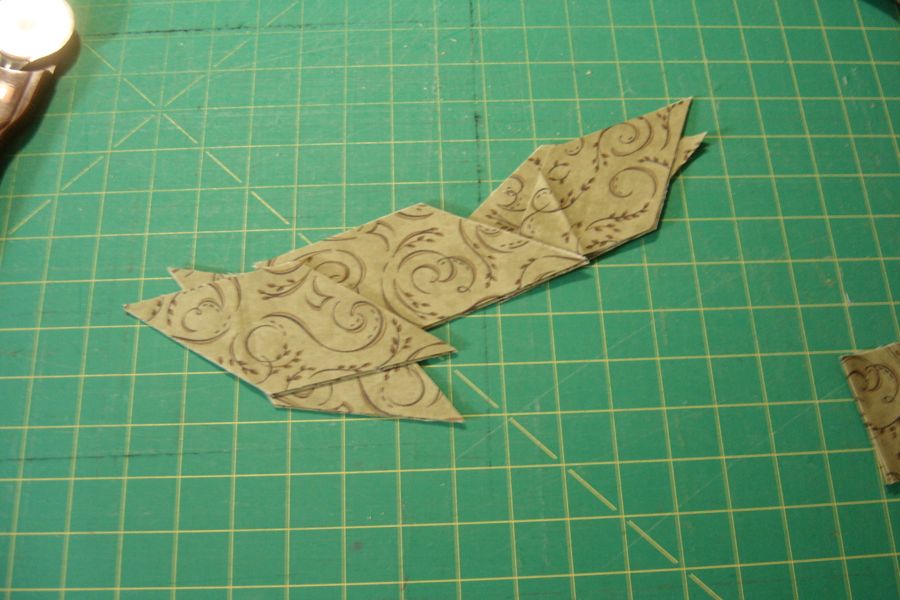
| I've ironed my fabric and trimmed up the top edge. Cutting diamonds as perfect as possible is a good idea. |
 |
| Trimmed |
 |
| Tad bit of waste |
 |
| 2 1/2" strips All of you know how to do this. Smiles can I hear smiles? |
 |
| Just a simple little 45° angle, you can do it. |
 | ||
Now cut 45° angles 2 1/2"
|

 |
| 10 diamonds ready to go. Those of you who are more experienced may cut 4 layers at a time if you want. |
 |
| Color choices? I keep my not used diamonds in baggies between star projects. This prevents the edges from fraying. Once you have become a star quilt fiend, you will love having some diamonds to start with. |
Here is a link to star quilts in progress elsewhere on my blog to help with ideas. http://parkersnowefiberartblog.blogspot.com/2011/11/watch-for-lone-star-quilt-tutorial.html
 |
| 7 colors is the starting point, you may want to add or subtract as you go. |
 |
| Other colors to be tempted by, oh my? |
 |
| More choices? |
 |
| This is it for the tutorial! |
 |
| Color 1 Row 1 = 8 diamonds there are two kinds of rows in a star quilt the circle rows, which this IS! and the sewing rows which this is NOT. |
 |
| Color 2 Row 2 = 16 diamonds |
 |
| Color 3, whoops I need more diamonds. Row 3 = 24 diamonds |
 |
| Since there are two scrap shapes, the 2 1/2" triangle and the rectangle I trim them up as I go and put them in two piles. Future projects. Just what we all need? |
 |
| Pieces for later. |
 |
| These are all the end rectangles from past star quilts. I am sewing them into short rows for now. I prefer to do a bit at a time. Later then will be a scrappy quilt all out of star quilt ends. I make a lot of star quilts. Some of you may only make one, but many of you do scrappy quilts. |
 |
| Color 4 Row 4 = 32 diamonds |
 |
| Color 5 Row 5 = 40 diamonds |
 |
| Color 6 Row 6 = 48 diamonds |
 |
| Color 7 Row 7 = 56 diamonds |
 |
| A different view of Color 7, Row 7. |
 |
| Color 2 Row 8 = 48 diamonds This is where you begin to go back in to form the star point. |
 |
| Now as I look at this, I wonder if I want the 7th color? This is where I walked away today, went to the store to buy immediate gratification food, so now I can spend the next couple of days writing this blog and sewing this quilt. |
 |
| I am leaning towards not liking Color 7. It seems to be too purple for the rest of the quilt and not enough contrast with Color 2. |
 |
| Color 1 Row 7 = 56 diamonds |
 |
| I have left both colors in for Row 7 at this point. I am leaning toward the darker one, which is the same as my center Row. This is where it begins to get fun. How do the colors feel to you? Do they move in a way you find pleasing? What kind of statement are you wanting to make? This is your quilt. |
 |
| Color 1 Row 7 = 56 diamonds I am going with my dark color the same as the center |
 |
| Row 8 = 48 diamonds Now there are choices again, which color the light pink or the wine? |
 |
| Row 8 = 48 diamonds Color 2 I decided on the wine |
 |
| Row 9 = 40 diamonds Color 5 |
 |
| Row 10 = 32 diamonds Now we have color choices again. Sometimes I repeat exactly like the center in reverse. For this quilt the I think one row of the dark green is enough. |
 |
| Row 11 = 24 diamonds Still playing with the tip of the point |
 |
| Row 11 = 24 diamonds Stepping back to look at it what to do? |
 |
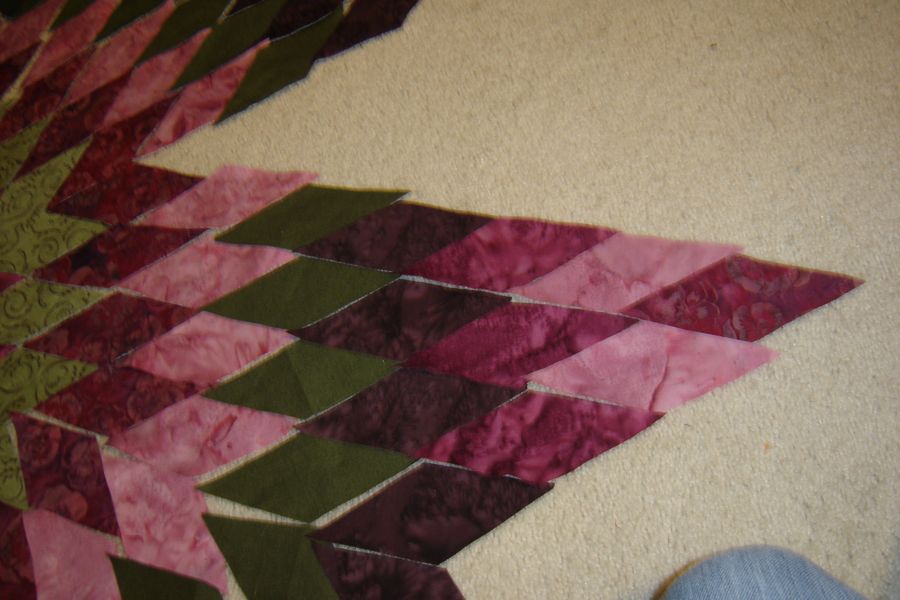
| Rows 10 - 13 One choice |
 |
| Rows 10 - 13 Another choice! I like this one best. Row 10 = 32 diamonds - color 4 Row 11 = 24 diamonds - color 3 Row 12 = 16 diamonds - color 2 Row 13 = 8 diamonds - color 1 |
 |
| This is it Now we are ready to sew! Yea! For those who want to experiment you can tweak the diamond placement. I am not doing that on this quilt because I like it just like it is. |
For all of you who have been following along up till this point, thank you and thank you for all of your notes and comments, it makes it all worthwhile! I love star quilts and teaching.
 |
| Use a 1/4" foot if you have one, if not use a piece of tape to mark 1/4" You want your seams to be consistent. |
 |
| Row 1 for sewing This is the top row staring with the point diamond pick them up in a stack. You will aways be sewing from the top in. Picking up the diamonds is from head to toe. Sewing the row together is from head to toe. When you join one row to the next it is toe to head. Just a helpful hint. |
 |
| 1st diamond on top on second |
 |
| 2nd diamond on top of 3rd |
 |
| 3rd diamond on top of 4th |
 |
| 4th diamond on top of 5th |
 |
| 5th and 6th on top of 7th you get it and even the 1st time people are getting it, aren't you? |
Backwards is not the end of the world, as long as you sew them all backwards. If you follow the pictures and place the diamonds the same every time it will be easy.
 |
| Needle is in the down position, the diamond is lined up more or less. If you always have your bottom diamond pointing to the left, it will work out fine. |
 |
| 2nd diamond goes on top of the 1st one. You see the little piece sticking out, that is 1/4" and you want to start at the top with the needle down, move your diamonds up to the needle and drop the pressure foot. Then sew, your needle should end in the V shape. |
 |
| 1/4" as a guide |
 |
| The needle is exactly in the V |
 |
| Sewing right along now. |
 |
| You did it! See how easy that is? |
 |
| Fold it over so diamond 2 is on top. |
 |
| Line up diamond 3 on top on diamond 2 and sew just like you already did. If you feel confused pretend like you are still just sewing 2 diamonds, which is what you are doing. |
 |
| Needle is down, V is lined up drop the pressure foot and sew |
 |
| Add diamond 4 |
 |
| Diamond 5 on top of 4 Easy! |
 |
| 6 goes on top of 5 |
 |
| Diamond 7 on top of 6 and you are done with row 1 of your 1st point YEA! |
 |
| Row 1 Outer point is to the left. Press all seams toward the outer point. This is something you will do consistently for all rows in all the points, it really makes it easy. |
 |
| Iron form the center out! Ironing toe to head. I want all the seams to be facing to the outside of the point! |
 |
| It will look perfect when you are done ironing! Really it will. |
 |
| Pick up Row 2 Remember start with the outer point, Head to toe! the one on the right in this pic |
 |
| Stacking with the outside point on the top |
 |
| Row 2 stacked and ready to sew. You are always staring with the top point |
 |
| Sew the row together the same as the first one always adding the next diamond in the stack to the one just sewn. |
 |
| Row 2 finished |
 |
| Iron from the inside to the out. Toe to head. As you can see the diamond I am starting with is part of the inner star. |
 |
| 2 rows ready to sew together |
 |
| See how nicely they line up. Row one on the top, row 2 on the bottom |
 |
| Fold row 2 over the top of row 1 you will have your V shapes 1/4" Sewing the strips together is done toe to head. |
 |
| Needle in the down position, 1/4" lower pressure foot and begin to sew |
For the "I must use pins" folks, please use them if that is what you are comfortable doing, sometimes we can learn new tricks and sometimes it's best to do what we are most comfortable doing.
I sew very slowly from X spot to X spot, there really is no rush, and I do use my seam ripper to mark the spot.
 |
| 1st intersection, when you fold row 2 back you should see a perfect X the needle remains down while you are checking this. |
 |
| The point of my seam ripper is marking the perfect X You old timers will love this, or not. I hate pins more then less and use them as little as possible. I must admit this last year I have learned, pins are our friends and we can use them. |
 |
| When sewing I am holding the seam ripper in my right hand at the X and sewing very slowly up to it. Once I get there I remove the seam ripper and keep sewing. It was impossible to get a picture with my left hand, sorry! |
 |
| Perfect X |
 |
| Use seam ripper to mark the X spot! |
 |
| Once again the seam ripper for every X |
 |
| AH HA the end of the 1st 2 rows sewn together. Congratulations. Now you know pretty much everything you need to know to finish you star quilt. |
 |
| Row 1 sewed to Row 2 |
 |
| On the ironing board, Row 1 is the top Row 2 is the bottom Remember you are pressing to the outer most edge. |
 |
| The seam are all facing to the outer point. |
 |
| See how nice! Your looks just like it right? |
 |
| Pick up row 3 from head to toe |
 |
| Sewing Row 3 |
 |
| They line up perfectly doing this lets you see if you have made a mistake, it is much easier to rip things out before you get to far. |
 |
| Fold row 3 onto Row 1 and sew toe to head |
 |
| Row 3 added |
 |
| Lay it on the ironing board with row 3 on the bottom, then flip it over you are still ironing toe to head. |
 |
| Like this |
 |
| Now iron toe to head |
 |
| Done, almost half way finished with one point |
 |
| Pick up Row 4 head to toe |
 |
| Head to toe Row 4 you know how to sew it right? toe to head, with the bottom diamond point to your left. I trust you! |
 |
| Iron toe to head row 4 |
 |
| Lay Row 4 next to Row 3 perfect match |
 |
| Row 4 onto Row 3 Sew toe to head, are you using the seam ripper trick? I bet those pinners are pinning away! |
 |
| Row 4 |
 |
| Remember when you are ironing your row to lie it on the ironing board with the most recent row on the bottom, flip the top rows up. You are still ironing always to to head. |
 |
| Perfect Yours looks just like this doesn't it? |
 |
| Pick up row 5 head to toe |
 |
| One nice little pile |
 |
| Sew head to toe |
 |
| Done |
 |
| Iron toe to head |
 |
| No mistakes no ripping ready to sew |
I am taking a little or huge break here, too many things are going wrong with the getting pics and writing. This is worse then ripping seams in my opinion. Sewing is oh so much easier!
In the meantime enjoy.
 |
| Iron row 5 toe to head |
 |
| See how nice it is coming along? |
 |
| Pick up Row 6 head to toe then sew head to toe |
 |
| Row 6 |
 |
| Iron Row 6 toe to head |
 |
| Lay Row 6 next to Row 5 looks good |
 |
| Flip Row 6 onto Row 5 and sew |
 |
| Iron Row 6 toe to head this should be making lots more sense to you now. All of the seams are facing toward the outer point. |
 |
| Row 6 done if you decided to use 6 diamonds across your point will now be done |
 |
| Pick up Row 7 head to toe |
 |
| Row 7 in a nice little stack ready to sew |
 |
| Iron Row 7 toe to head |
 |
| Row 7 no mistakes ready to sew |
 |
| Flip Row 7 onto Row 6 and sew |
 |
| Row 7 added make sure to iron all seams toward the outside point |
 |
| Iron Row 7 toe to head |
|
| One point finished, complete totally done, the other 7 will be a piece of cake! |
I will do this in a second part, I think this is getting to long, my pictures end up in places they are not supposed to be.
Hope you've had a wonderful time so far.
Parker
Star Quilt Tutorial Part II
is at a blog near you.
13 comments:
Wow - that's going to be a beautiful quilt!
wow, I love this....amazing....maybe I can do this, I have this diamond die for my Baby GO cutter......of course, it might be of different size.
Wow you are definitely making it much easier than the way I've
assembled mine so far! Thanks!
I've been looking for good information on hoe to put one of these together for a long time, thanks! Can't wait to see how this turns out.
wow, I am so glad I decided to click on your blog link from QB. This is just about my favorite color combination and I have never done any kind of star of this proportion.
I have too many irons in the fire to do it right now, but I have these fabrics.
I'm looking forward to more. Yours looks perfect! Mousie :)
Thank you!! I have been looking for instructions how to sew together a star qult. Very well done.
Stacy - you are welcome!
You said that you love star quilts...
Have you ever seen a tutorial for one like this? This one starts with 6 diamonds instead of 8....does that matter, or would it pretty much use the same tutorial?
http://s3.amazonaws.com/data.tumblr.com/tumblr_kp8cwiGocc1qzwph7o1_1280.jpg?AWSAccessKeyId=AKIAI6WLSGT7Y3ET7ADQ&Expires=1348899068&Signature=FhuYZ48tILBfKtyVjdGocUVTsD4%3D
This is the hard way to make a star quilt!!!!!!
Thank You! I have been looking for a tutorial on star quilts for a while now. I can now finish the quilt my Grandmother started!
Thank you so much for your tutorial on the star quilt. I've looked at this quilt for some time and I think you've motivated me to sew one!
Thank you, thank you, for this amazing tutorial. I fell in love with the lone star pattern despite the fact that it was beyond my skillset, and I searched for ages to find a tutorial online that was simple enough for me to follow. Yours finally fit the bill, and the quilt I created is not without flaws, but something I'm still proud of to this day and helped my confidence as a quilter immensely. Unfortunately I can't figure out how to attach a picture...but if I could, I would! Thank you again!
this quilt is beautiful, what size is it?
Post a Comment